Why can’t I Save to PDF or Email with Accounts Business?

Reckon FAQs
Reckon Staff Posts: 278  Reckon Staff
If you have problems when trying to save as a PDF or when emailing from Accounts Business, try assigning the QuickBooks V4 PDF Converter to its own printer port.
Close Accounts Business and delete the printer files QBPRINT.QBP and wpr.ini. If you need help just follow the guide here: http://kb.reckon.com.au/kb/issue_view.asp?ID=4934
Open Devices and Printers>Right click QuickBooks V4 PDF Converter, select Printer Properties and then click into the Ports tab.
To assign QuickBooks V4 PDF Converter to its own port and Click Add Port>Highlight ‘Local Port’ then click New Port>Enter a name> Okay > Close.
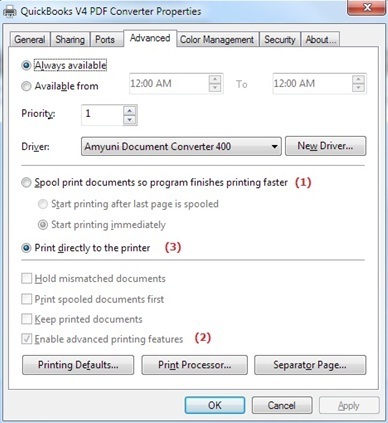
Now you’ll need to configure the new port. Click into the Advanced tab then:
(1) Select ‘Spool print documents so program finishes printing faster’
(2) Un-tick the check box labelled ‘Enable advanced printing features
(3) Select 'Print directly to printer

(4) Now open your Task Manager (Ctrl Shift Esc on your keyboard)> Open the Processes tab, right-click splWOW64.exe and select End Process. Accept yes to the warning. (Windows 8 users must use Background Processes > SpoolerSubSystem App > Print Spooler).
(5) Close both the Task Manager and Printer Properties windows then delete your print files again.
(6) Right click your Accounts Business desktop icon and under the Properties tab set the Compatibility to ‘Run As Administrator’. we recommend you select ‘Run this program in compatibility mode for’ and select Windows XP (Service Pack 3)).
Okay, that’s it, we’re done! Reboot your PC and see how you go and as always, if you have any questions please ask!
Close Accounts Business and delete the printer files QBPRINT.QBP and wpr.ini. If you need help just follow the guide here: http://kb.reckon.com.au/kb/issue_view.asp?ID=4934
Open Devices and Printers>Right click QuickBooks V4 PDF Converter, select Printer Properties and then click into the Ports tab.
To assign QuickBooks V4 PDF Converter to its own port and Click Add Port>Highlight ‘Local Port’ then click New Port>Enter a name> Okay > Close.
Now you’ll need to configure the new port. Click into the Advanced tab then:
(1) Select ‘Spool print documents so program finishes printing faster’
(2) Un-tick the check box labelled ‘Enable advanced printing features
(3) Select 'Print directly to printer

(4) Now open your Task Manager (Ctrl Shift Esc on your keyboard)> Open the Processes tab, right-click splWOW64.exe and select End Process. Accept yes to the warning. (Windows 8 users must use Background Processes > SpoolerSubSystem App > Print Spooler).
(5) Close both the Task Manager and Printer Properties windows then delete your print files again.
(6) Right click your Accounts Business desktop icon and under the Properties tab set the Compatibility to ‘Run As Administrator’. we recommend you select ‘Run this program in compatibility mode for’ and select Windows XP (Service Pack 3)).
Okay, that’s it, we’re done! Reboot your PC and see how you go and as always, if you have any questions please ask!
0
This discussion has been closed.