How to create a backup in Reckon Accounts (Desktop)

Datarec
Reckon Staff Posts: 1,485  Reckon Staff
Follow the steps below to create a backup file which is stored on your local computer.
With your company data file open in the Reckon Accounts program.
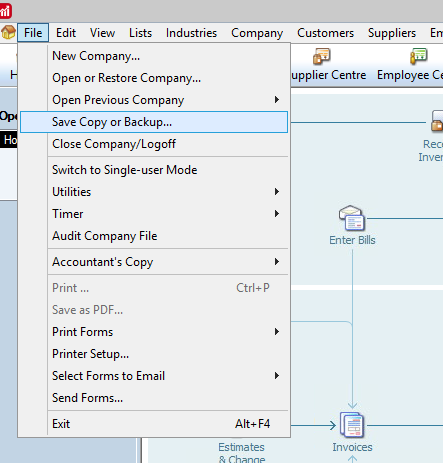
1. Click on the File menu > Save Copy or Backup
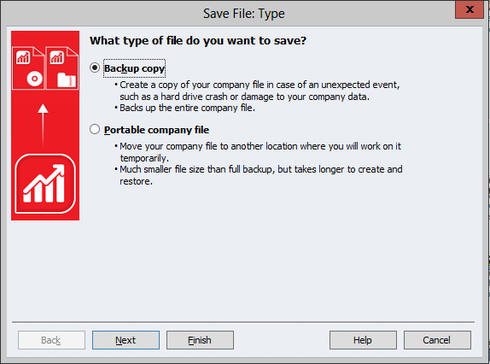
2. Select Backup copy and then click the Next button
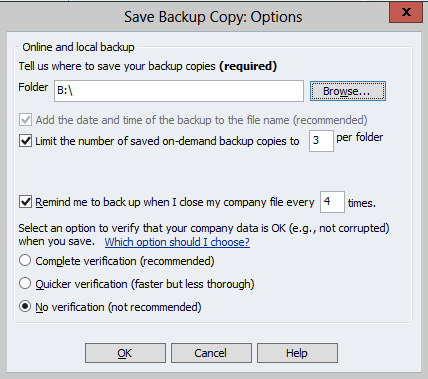
3. Click on the Options button to display the Save Backup Copy:Options screen
You may have for example an external hard disk drive or a specially designated documents folder where you prefer to store your data files and backup files.
You need to decide where you want your backup sets stored.
For your daily or regular backup procedure, we recommend that you select the “Complete verification” option and then click the OK button to return to the Save Backup: Method screen
· For those times when you are performing a pre-verification backup as part of an investigation into a potentially damaged data file, we recommend that you select the No verification (not recommended) option and click the OK button
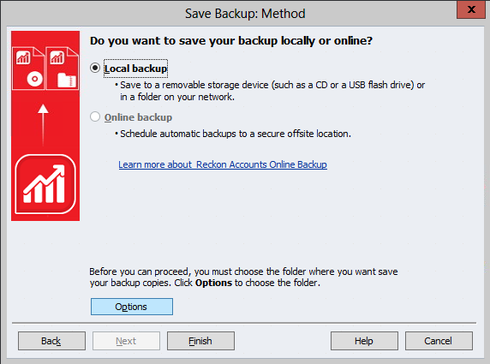
6. Once you are back in the Save Backup: Method screen, click on the Finish button to proceed with and finalise the backup process.
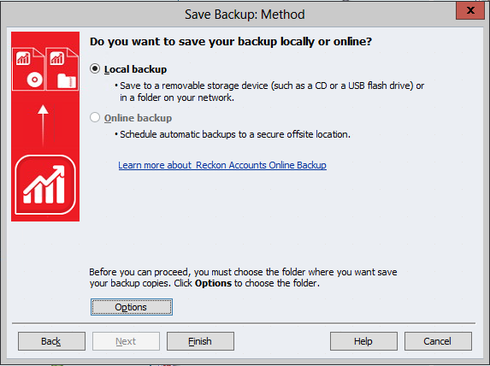
7. Once the backup has completed you will be prompted with a similar message prompt as shown below. Click the OK button

8. We recommend that you also regularly keep a secondary copy of the backup which you could store on an online file storage service (online backup) or to an external portable hard disk drive or high capacity USB flash drive.
With your company data file open in the Reckon Accounts program.
1. Click on the File menu > Save Copy or Backup

2. Select Backup copy and then click the Next button

3. Click on the Options button to display the Save Backup Copy:Options screen
4. In this screen you can choose the folder location to which the backup file will be stored.
You may have for example an external hard disk drive or a specially designated documents folder where you prefer to store your data files and backup files.
You need to decide where you want your backup sets stored.
For your daily or regular backup procedure, we recommend that you select the “Complete verification” option and then click the OK button to return to the Save Backup: Method screen
· For those times when you are performing a pre-verification backup as part of an investigation into a potentially damaged data file, we recommend that you select the No verification (not recommended) option and click the OK button

6. Once you are back in the Save Backup: Method screen, click on the Finish button to proceed with and finalise the backup process.

7. Once the backup has completed you will be prompted with a similar message prompt as shown below. Click the OK button
8. We recommend that you also regularly keep a secondary copy of the backup which you could store on an online file storage service (online backup) or to an external portable hard disk drive or high capacity USB flash drive.
* Data Recovery Team *
Searching the Reckon Help and Support Centre | Asking good questions on the Community
#TipTuesday: Picture Paints a Thousand Words | How do I add screenshots to my discussion?
0
This discussion has been closed.
