Reckon One Update (24 October 2017)

Rav
Administrator, Reckon Staff Posts: 14,338 Reckon Community Manager 
Hi everyone,
Reckon One has received an update which has brought in new functionality including the addition of Ezidebit support for the payment of invoices!
Check out the details below
EZIDEBIT
Reckon One now supports Ezidebit payments for invoices!
Ezidebit integration is available to Australian books that have the invoicing module enabled. You will require account with Ezidebit to use the Ezidebit integration within Reckon One.
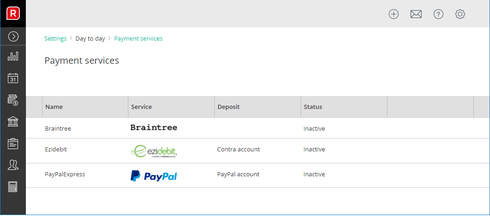
To enable Ezidebit in Reckon One, you will need to configure the Ezidebit payment service. To access this page, select the Administration menu > Settings > Payment services > Ezidebit.
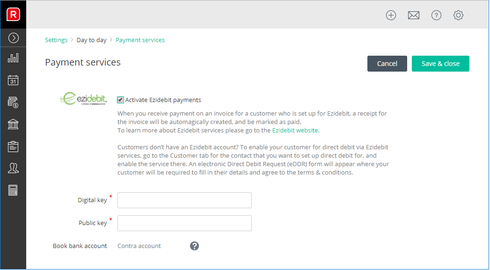
Enable the ‘Activate Ezidebit payments’ option, then enter the digital key and public key that has been given to you by Ezidebit.
PLEASE NOTE: You require an account with Ezidebit. If you don’t have an account with Ezidebit, you can sign up by clicking the ‘Ezidebit website’ link in Reckon One.
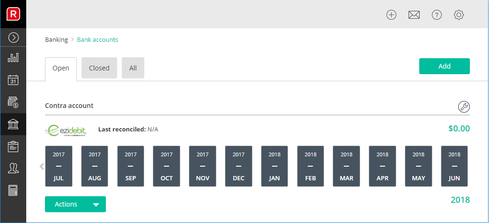
Once you have successfully enabled Ezidebit in Reckon One, a new bank account ‘Contra account’ is automatically created. This bank account will be used by Reckon One to deposit Ezidebit payments.
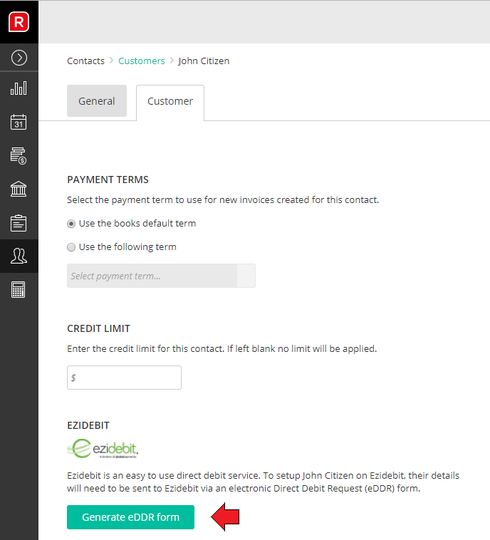
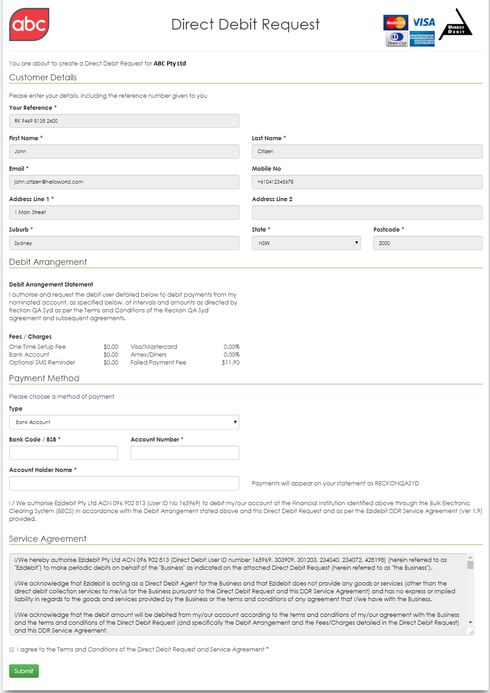
You will need to setup Ezidebit for each customer that you want to receive invoice payments using Ezidebit. To do this, edit the customer and click the ‘Customer’ tab within their customer record. Click the ‘Generate eDDR form’ (Ezidebit Direct Debit Request)
Together, you and your customer need to complete andsubmit this form electronically to Ezidebit. Once submitted the customer willreceive an email from Ezidebit regarding their new account with Ezidebit.
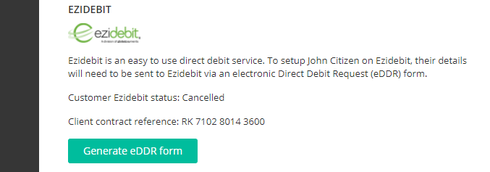
Once Ezidebit is enabled for a customer, their customer record will show an active status and their client contract reference number.
If you need to terminate the Ezidebit service for this customer, you can do this by clicking ‘Stop payments’.

After stopping the payments, the customer record will show a cancelled status. If you want to re-enable Ezidebit for this customer you will need to click ‘Generate eDDR’ submit a new eDDR form to Ezidebit.
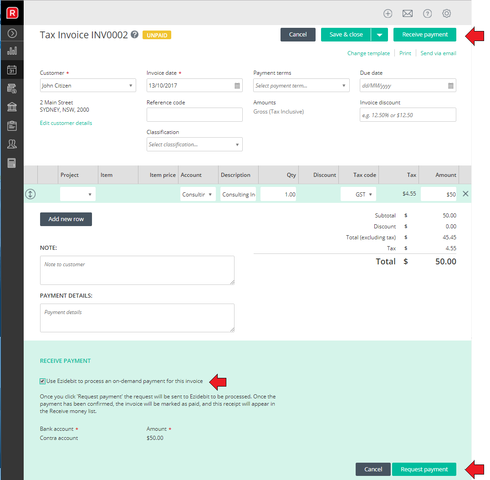
Once you have a customer configured for Ezidebit In Reckon One, you can request for their invoice to be paid using Ezidebit.
1. Save an invoice for a customer who is setup for Ezidebit
2. Click ‘Receive payment’ within the invoice
3. Tick ‘Use Ezidebit to process an on-demand payment for this invoice’
4. Click ‘Request payment’
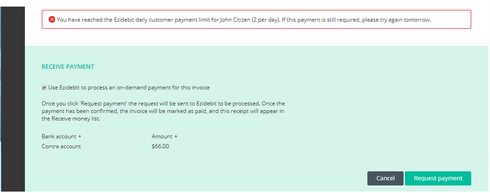
Whilst an payment request is pending for an invoice, you cannot send an additional payment request for the same invoice. If you try to do this you will receive a message informing you of the pending request.

Ezidebit allows you to submit a maximum of two payment requests for each of your customers per day. If you try to exceed this limit, you will see a message in Reckon One that informs you of this limit.
Once Ezidebit have successfully processed an invoice payment request, a receipt will be created in Reckon One. The receipt will use the bank account ‘Contra account’. The details field will show an entry ‘Received via Ezidebit’. The reference field will show applicable reference from Ezidebit. The allocated tab within the receipt will link to and pay the invoice.
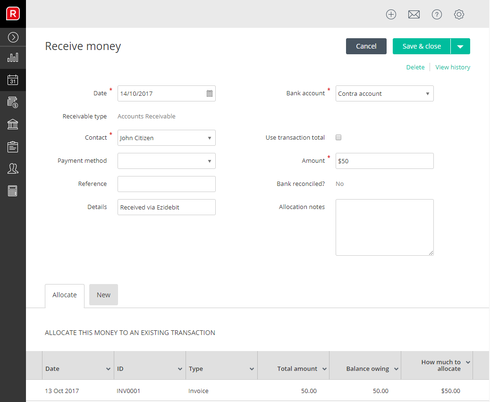
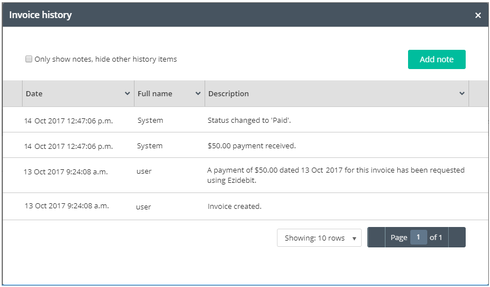
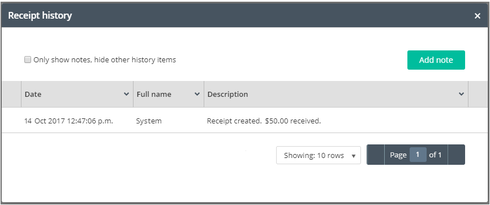
Audit history will be added to both the invoice and the receipt.
IMPORTANT: Reckon One & Ezidebit
To setup and use the Ezidebit feature in Reckon One, you will be required to ‘Edit’ permissions to the Payment services role option. To configure roles please click the Administration menu > Settings > Roles
The Ezidebit payment service cannot be disabled in Reckon One whilst one or more customers has an active Ezidebit status. You will need to stop the Ezidebit service for all customers before disabling the Ezidebit payment service.
A customer in Reckon One cannot be made inactive whilst they have an active Ezidebit status. You will need to stop the Ezidebit service for the customer before making them inactive.
In the scenario where an invoice has been updated after sending a payment request to Ezidebit;
PAYROLL SETUP
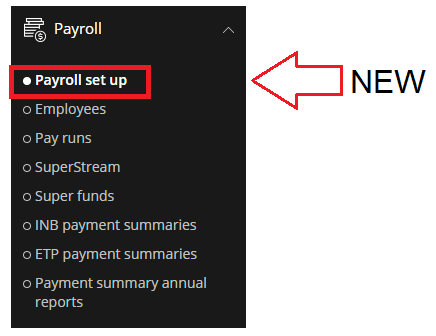
The navigation panel contains a new option called 'Payroll Set Up'. This is located under the Payroll section. When selected you will be navigated to the 'General' page of the payroll settings.
ADD PAY ITEMS ON FLY
Pay items can now be added from the Pay set up page of an employee’s record. When adding a new row, the pay item drop down list will contain a 'Entry not here? Add pay item' selection option.
The add pay item option is available for Earnings, Allowances, Deductions, Superannuation and Company contributions areas.
To add a pay item on the fly: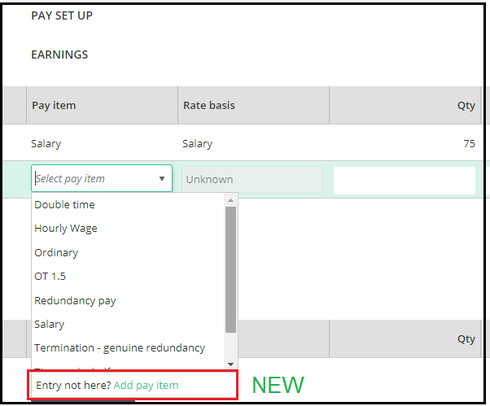
REPORTS: WITHOLDING changed to PAYG TAX
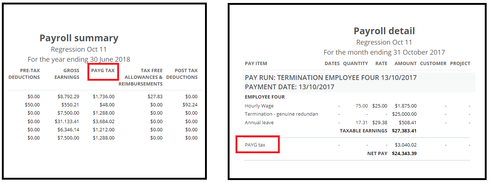
References to ‘Withholding’ has now been replaced with “PAYG tax”. This change appears on the Payroll Summary and Payroll detail report.
REPORTS: PAYROLL SUMMARY - RESC column
A column called RESC has been added to the payroll summary report. The addition of this column allows you to track the amount of Reportable Employer Super Contributions (RESC) for an employee and compare this against the INB Payment summary.

Reckon One has received an update which has brought in new functionality including the addition of Ezidebit support for the payment of invoices!
Check out the details below
EZIDEBIT
Reckon One now supports Ezidebit payments for invoices!
Ezidebit integration is available to Australian books that have the invoicing module enabled. You will require account with Ezidebit to use the Ezidebit integration within Reckon One.
To enable Ezidebit in Reckon One, you will need to configure the Ezidebit payment service. To access this page, select the Administration menu > Settings > Payment services > Ezidebit.

Enable the ‘Activate Ezidebit payments’ option, then enter the digital key and public key that has been given to you by Ezidebit.
PLEASE NOTE: You require an account with Ezidebit. If you don’t have an account with Ezidebit, you can sign up by clicking the ‘Ezidebit website’ link in Reckon One.

Once you have successfully enabled Ezidebit in Reckon One, a new bank account ‘Contra account’ is automatically created. This bank account will be used by Reckon One to deposit Ezidebit payments.

You will need to setup Ezidebit for each customer that you want to receive invoice payments using Ezidebit. To do this, edit the customer and click the ‘Customer’ tab within their customer record. Click the ‘Generate eDDR form’ (Ezidebit Direct Debit Request)

Together, you and your customer need to complete andsubmit this form electronically to Ezidebit. Once submitted the customer willreceive an email from Ezidebit regarding their new account with Ezidebit.

Once Ezidebit is enabled for a customer, their customer record will show an active status and their client contract reference number.
If you need to terminate the Ezidebit service for this customer, you can do this by clicking ‘Stop payments’.

After stopping the payments, the customer record will show a cancelled status. If you want to re-enable Ezidebit for this customer you will need to click ‘Generate eDDR’ submit a new eDDR form to Ezidebit.

Once you have a customer configured for Ezidebit In Reckon One, you can request for their invoice to be paid using Ezidebit.
1. Save an invoice for a customer who is setup for Ezidebit
2. Click ‘Receive payment’ within the invoice
3. Tick ‘Use Ezidebit to process an on-demand payment for this invoice’
4. Click ‘Request payment’

Whilst an payment request is pending for an invoice, you cannot send an additional payment request for the same invoice. If you try to do this you will receive a message informing you of the pending request.

Ezidebit allows you to submit a maximum of two payment requests for each of your customers per day. If you try to exceed this limit, you will see a message in Reckon One that informs you of this limit.

Once Ezidebit have successfully processed an invoice payment request, a receipt will be created in Reckon One. The receipt will use the bank account ‘Contra account’. The details field will show an entry ‘Received via Ezidebit’. The reference field will show applicable reference from Ezidebit. The allocated tab within the receipt will link to and pay the invoice.

Audit history will be added to both the invoice and the receipt.


IMPORTANT: Reckon One & Ezidebit
To setup and use the Ezidebit feature in Reckon One, you will be required to ‘Edit’ permissions to the Payment services role option. To configure roles please click the Administration menu > Settings > Roles
The Ezidebit payment service cannot be disabled in Reckon One whilst one or more customers has an active Ezidebit status. You will need to stop the Ezidebit service for all customers before disabling the Ezidebit payment service.
A customer in Reckon One cannot be made inactive whilst they have an active Ezidebit status. You will need to stop the Ezidebit service for the customer before making them inactive.
In the scenario where an invoice has been updated after sending a payment request to Ezidebit;
- If the invoice amount was increased, the receipt created will use the original requested amount. The invoice will be partially paid.
- If the invoice amount was reduced, the receipt created will use the original requested amount. The invoice will be paid and the difference will be unallocated on the receipt resulting in a credit for the customer.
- If the invoice was deleted, the receipt created will use the original requested amount. The full receipt amount will be unallocated resulting in a credit for the customer.
- If the invoice was updated to ‘Draft’, the receipt created will use the original requested amount. The full receipt amount will be unallocated resulting in a credit for the customer.
- If the invoice was updated to ‘Paid’, the receipt created will use the original requested amount. The full receipt amount will be unallocated resulting in a credit for the customer.
- If the invoice is available in Reckon One, an audit history entry will be recorded against the invoice regarding this failure. No receipt transaction will be saved. You will need to repeat the request process again.
- If the invoice is not available in Reckon One, an audit history entry will be recorded against the Ezidebit payment service regarding this failure. No receipt transaction will be saved. You will need to repeat the request process again.
- If the invoice is available in Reckon One, an audit history entry will be recorded against the invoice regarding this failure. No receipt transaction will be saved.
- If the invoice is not available in Reckon One, an audit history entry will be recorded against the Ezidebit payment service regarding this failure. No receipt transaction will be saved.
- Ezidebit could not process the invoice payment request (ie. due to invalid banking details). In this scenario you would need to repeat the payment request after correcting the problem.
- The book lock date has been set with a date which prevents the receipt from being saved. In this scenario you would need to update the book lock off date and manually enter the receipt.
- The bank account has lock off date has been set with a date which prevents the receipt from being saved. In this scenario you would need to update the bank account lock off date and manually enter the receipt.
- The bank account close date has been set with a date which prevents the receipt from being saved. In this scenario you would need to update the bank account close date and manually enter the receipt.
- The book is read only (ie. renewal overdue) which prevents the receipt from being saved. In this scenario you would need to correct the book problem and manually enter the receipt.
PAYROLL SETUP
The navigation panel contains a new option called 'Payroll Set Up'. This is located under the Payroll section. When selected you will be navigated to the 'General' page of the payroll settings.

ADD PAY ITEMS ON FLY
Pay items can now be added from the Pay set up page of an employee’s record. When adding a new row, the pay item drop down list will contain a 'Entry not here? Add pay item' selection option.
The add pay item option is available for Earnings, Allowances, Deductions, Superannuation and Company contributions areas.
To add a pay item on the fly:
- Click Payroll menu from the side navigation panel and choose Employees
- Click on an employee’s name and choose Pay set up tab.
- Click Add new row under any of the available areas
- Click into the pay item field and click the arrow icon
- Click on Add pay item
- Complete the add pay item fields and click save

REPORTS: WITHOLDING changed to PAYG TAX
References to ‘Withholding’ has now been replaced with “PAYG tax”. This change appears on the Payroll Summary and Payroll detail report.

REPORTS: PAYROLL SUMMARY - RESC column
A column called RESC has been added to the payroll summary report. The addition of this column allows you to track the amount of Reportable Employer Super Contributions (RESC) for an employee and compare this against the INB Payment summary.

0
This discussion has been closed.