Example of using Custom Fields for items used in invoices and have them displaying in reports

Datarec
Reckon Staff Posts: 1,435  Reckon Staff
For Reckon Accounts Business range (desktop/hosted).
The screenshots below are from a reply by Donna Barletta to another related post
https://community.reckon.com/reckon/topics/column-item-not-appearing-in-sales-report
--------------------------------------------------------------------------------------------------------------------
1. go to a stock line, make a custom field Batch and tick.

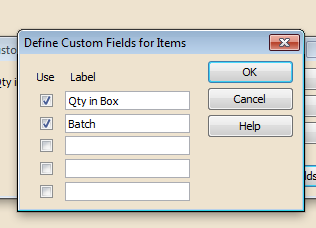
After you click OK, you'll see the menu - don't enter anything in the field, just click OK.
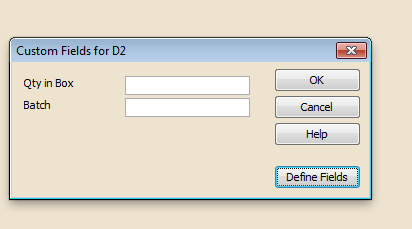
Go to the home screen, and click on invoice.
On the Tab bar above create Invoice you'll see a customise button.

Click on Manage Templates, and select the invoice template that you use,
Then click OK
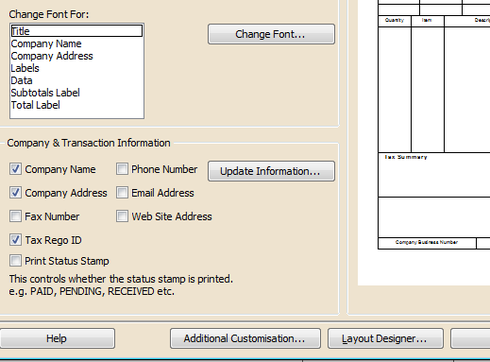
Click on Additional customisation down the bottom
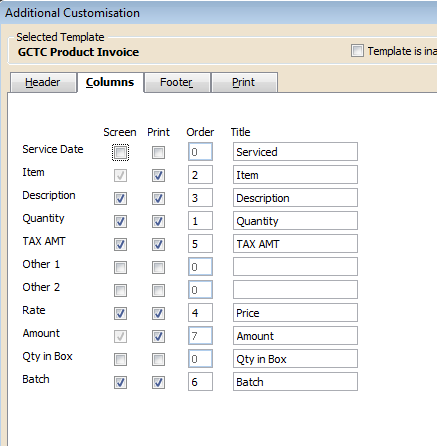
Then click on the columns tab at the Top. Click both boxes for Screen and Print beside Batch.
The Order Numbers are where you'd like that column to appear on the invoices from left to right. So you can change these numbers around to suit yourself. Then click OK.
#you may get a error message after this telling you that the fields are overlapping (you shouldn't, but you might if you're working on other fields). If you do, just go into layout designer and move the lines around until the fields aren't overlapping any more.
Then, create an invoice using this same invoice that you just customised, and put in your batch numbers.
Then when you want to create a report, select the report you want, then select modify up the top
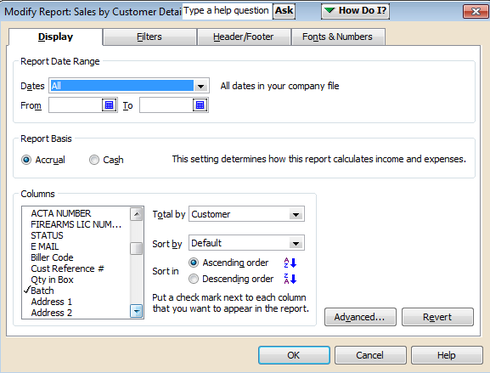
And this menu appears. Go through the Columns until you find Batch, and click on it.
this will give you the report and will show all the batch numbers beside each entry.
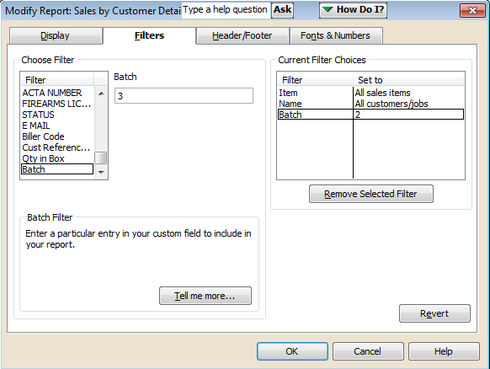
If you'd like to do this same report, but just for items in batch 3, Select Filters tab at the top,
Then on the left you'll find a Filter list - go through that until you find Batch, and then type in the batch number you want in the Batch field and press OK.
Memorise the report - so all these selections are saved and you won't need to set it up again.
Thanks to Donna Barletta for her clear explanation.
--------------------------------------------------------------------------------------------------------------------
For information regarding custom fields, please use the built-in product documentation.
Click on the Help menu and select Reckon Accounts Help
The keywords custom fields will show the relevant info.
The screenshots below are from a reply by Donna Barletta to another related post
https://community.reckon.com/reckon/topics/column-item-not-appearing-in-sales-report
--------------------------------------------------------------------------------------------------------------------
1. go to a stock line, make a custom field Batch and tick.


After you click OK, you'll see the menu - don't enter anything in the field, just click OK.

Go to the home screen, and click on invoice.
On the Tab bar above create Invoice you'll see a customise button.

Click on Manage Templates, and select the invoice template that you use,
Then click OK
Click on Additional customisation down the bottom

Then click on the columns tab at the Top. Click both boxes for Screen and Print beside Batch.
The Order Numbers are where you'd like that column to appear on the invoices from left to right. So you can change these numbers around to suit yourself. Then click OK.
#you may get a error message after this telling you that the fields are overlapping (you shouldn't, but you might if you're working on other fields). If you do, just go into layout designer and move the lines around until the fields aren't overlapping any more.

Then, create an invoice using this same invoice that you just customised, and put in your batch numbers.
Then when you want to create a report, select the report you want, then select modify up the top

And this menu appears. Go through the Columns until you find Batch, and click on it.
this will give you the report and will show all the batch numbers beside each entry.
If you'd like to do this same report, but just for items in batch 3, Select Filters tab at the top,
Then on the left you'll find a Filter list - go through that until you find Batch, and then type in the batch number you want in the Batch field and press OK.
Memorise the report - so all these selections are saved and you won't need to set it up again.

Thanks to Donna Barletta for her clear explanation.
--------------------------------------------------------------------------------------------------------------------
For information regarding custom fields, please use the built-in product documentation.
Click on the Help menu and select Reckon Accounts Help
The keywords custom fields will show the relevant info.
* Data Recovery Team *
Searching the Reckon Help and Support Centre | Asking good questions on the Community
#TipTuesday: Picture Paints a Thousand Words | How do I add screenshots to my discussion?
1
Comments
-
Best help from Donna, so grateful!
1 -
Thanks so much, that tutorial was amazing and very helpful…
1 -
It's great when the community shares their experience and tips.
Searching the Reckon Help and Support Centre | Asking good questions on the Community
#TipTuesday: Picture Paints a Thousand Words | How do I add screenshots to my discussion?
1
