DATA RECOVERY: How to move file from Upload folder to Q drive root folder on Reckon Accounts Hosted


Step 1: Login to the Hosted platform
Access the Hosted platform login page through the link below.
AU https://hosted.reckon.com/RAHV2/ReckonAccountsLogon.aspx
NZ https://hostednz.reckon.com/RAHV2/ReckonAccountsLogon.aspx
Step 2: Launch the Accounts Hosted application
Choose the correct Hosted version and launch it by clicking the button

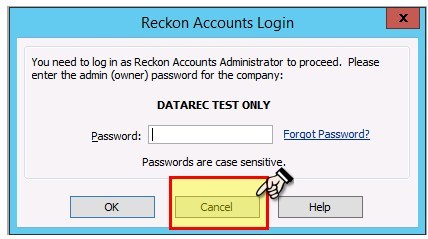
When you see the Reckon Accounts Login screen, press the Cancel button.
Step 3: Locate the existing data file that you need to rename
1. When the Reckon Accounts Hosted software is displaying the “No Company Open” screen:

2. Click on “Open or restore an existing company file”
3. Select the “Open a company file (.QBW)” option then click the Next button
4. When prompted with the Open a Company dialog window, you will need to locate the data file which is located in the Q:\Upload by navigating inside the folder (double-click on the Upload folder)

Step 4: Select data file that you need to move
1. Click on any ‘white blank space’ area to target the active window
2. Now use the arrow keys on the keyboard to move up/down until the name of the data file that needs to be moved is selected and highlighted
The company file will typically have a red icon alongside the file name.
Do not mouse-click onto the file name as this would initiate the opening of that file
3. Press the CTRL and "X" (the letter x) simultaneously (CTRL+X) to 'copy/cut' the file
Step 5: Move data file to the Q: root
1. Click the icon with the green arrow to navigate back out of the Upload folder

2.. Then when you are back in the "Look in: My Live (Q:)" folder press the CTRL and "V" (the letter v) simultaneously (CTRL+V) to 'paste/move' the file
Step 6: Open the data file
You can now select the file that is now on the Q: drive and click the Open button
Data Recovery Team
Regards,
Reckon Data Recovery Team
How to ask good questions on the Reckon Community
Data Services Tip - Try this first before requesting a data service
Categories
- All Categories
- 6.4K Accounts Hosted
- 10 📢 Reckon Accounts Hosted - Announcements
- 5.9K Reckon Accounts (Desktop)
- 3 📢 Reckon Accounts Desktop - Announcements
- 1.3K Reckon Payroll 🚀
- 21 📢 Reckon Payroll - Announcements
- 21 Reckon Payroll Help Videos 🎥
- 21 Reckon Mate App
- 3K Reckon One
- 7 📢 Reckon One - Announcements
- 10 Reckon Invoices App
- 14 Reckon Insights
- 107 Reckon API
- 822 Payroll Premier
- 307 Point of Sale
- 1.9K Personal Plus and Home & Business
- 63 About Reckon Community